Tuesday 12 August 2014

PeopleSoft Pivot Grid

The PeopleSoft Pivot Grid is a reporting tool used to provide a pivot table and  chart representation of live data using PS Query data source. This enables users to visually display data in a dashboard. Data can be displayed in different views by performing operations such as pivoting and filtering, which enables business analysts to interpret data in a variety of ways.

Business Benefits:         
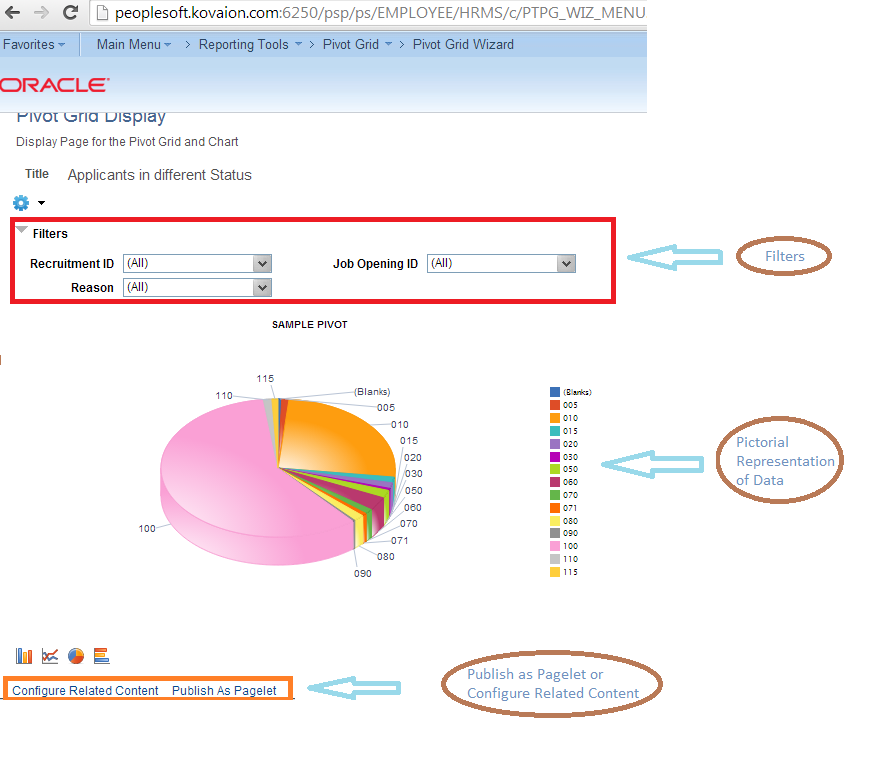
  1. Pivot grids can be published as pagelets, so can be published on home page or any other navigation.
E.g.: Managers can use this pivot grid on their Dashboard to track the Employees Report, Direct Line Reports, Employees Head count etc…


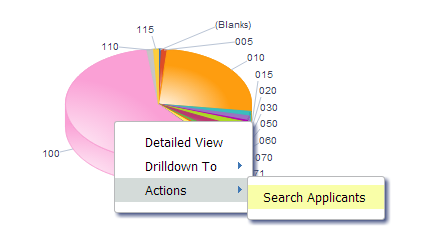
  1. Users can take action directly from the chart/report. - Related Content can be configured in Pivot grid.
  1. Drilling Down on the Aggregate Values
                  
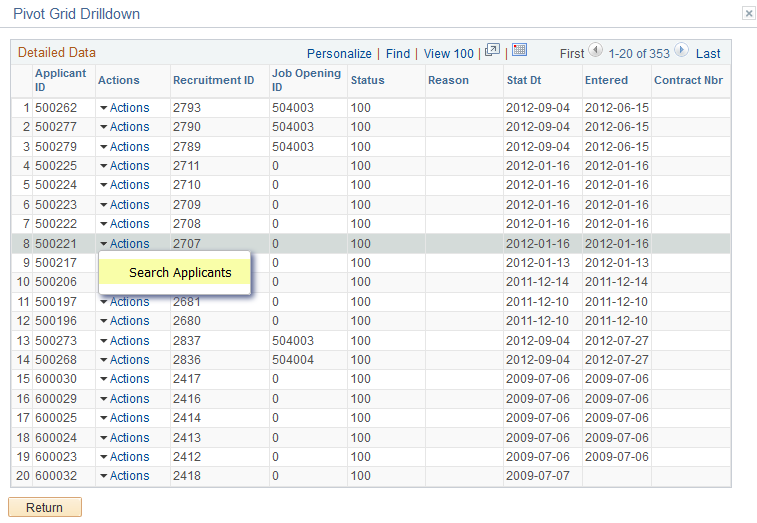
The detailed view displays the complete data of the grid and Actions dropdown helps navigate to related links or action can be taken.
  1. Inter Window Communication: Pivot Grid Pagelets can interact with each other and with the transaction pages. Configure Publication and Subscription with all the intersecting Prompt and Filter values between Pivot grids. We get the consistent behavior with progressive filtering in the publisher and subscriber.

  1. Pivot grids can be published as Related Content on any of the components, so that the user can refer them easily.

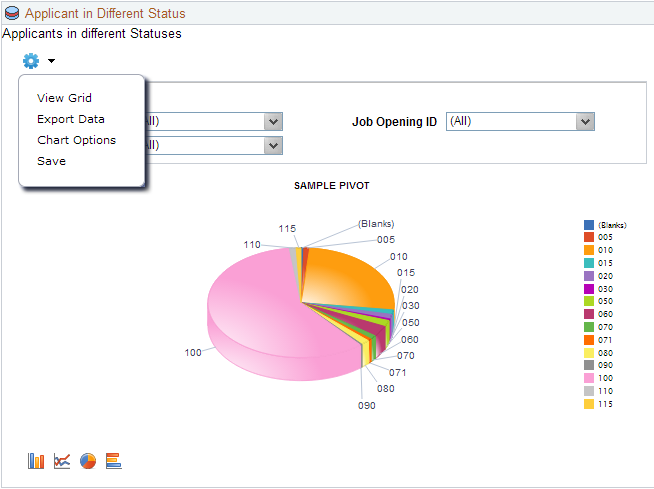
  1. Displaying Grid from Chart-only view -  Display the grid from a chart-only view and then perform various actions—such as pivoting data, dragging and dropping, and slicing and filtering data—to change the grid layout. After the layout is satisfactory, you can synchronize the chart with the grid view.

  1. View grid option allows user to display the results of the query in grid format and filters can be applied.

  1. PeopleSoft Pivot Grids allow the user to analyze data within the PeopleSoft application.  The advantage here is that, as we all know, initial data analysis often leads to more questions and a need for deeper analysis. PeopleSoft Pivot Grids allow the user to dive deeper, all the way down to the transactional level into the system to grab more data for the desktop spreadsheet. It is cleaner, easier and more efficient.
  2. Pivot Grids allow the user in a specific job role to focus on the activities that are most important to their specific job requirements.  The user is able to immediately access the most Relevant information for their role. Information is easily prioritized and action lists can be created.

Development Process
Pivot grid can be developed in five easy steps:
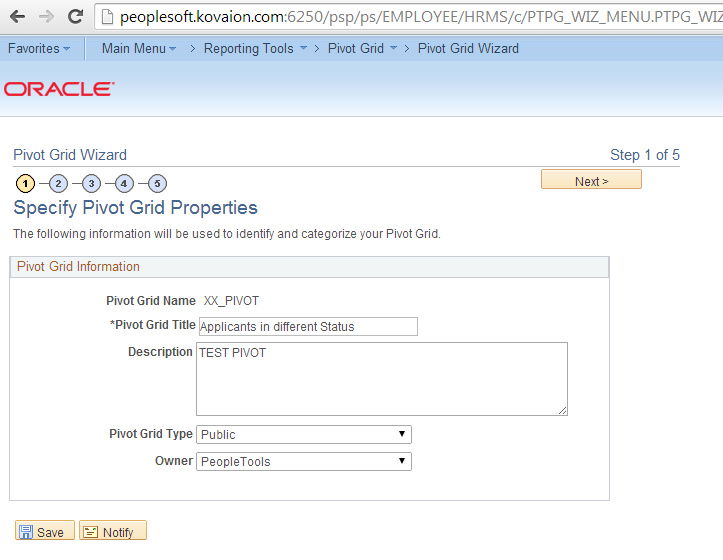
Navigation: Main Menu -> Reporting Tools -> Pivot Grid -> Pivot Grid Wizard.

Step1: Provide pivot grid basic details - grid name, title and type.

Step 2: Provide data source type and PS Query name.
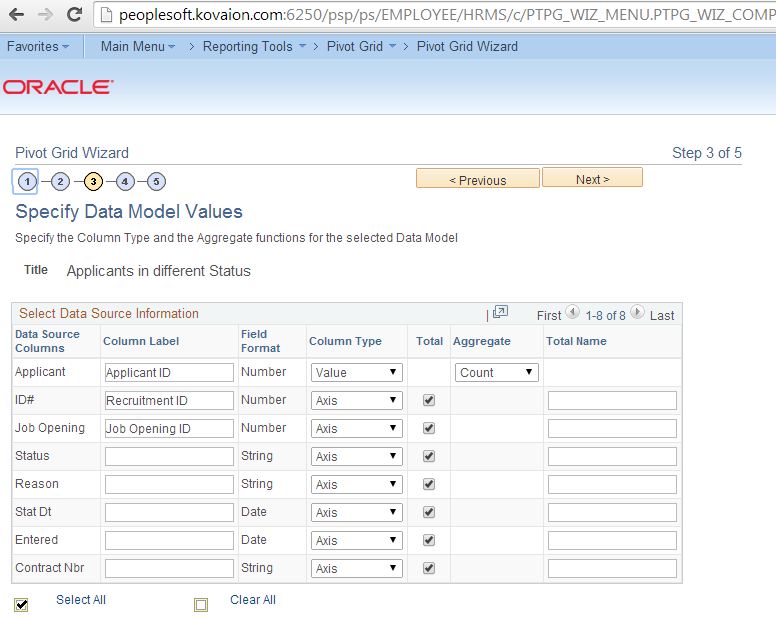
Step 3: Provide data model values. At least one value and axis for the column should be specified.
Along with at least one value and axis specifying for the columns.

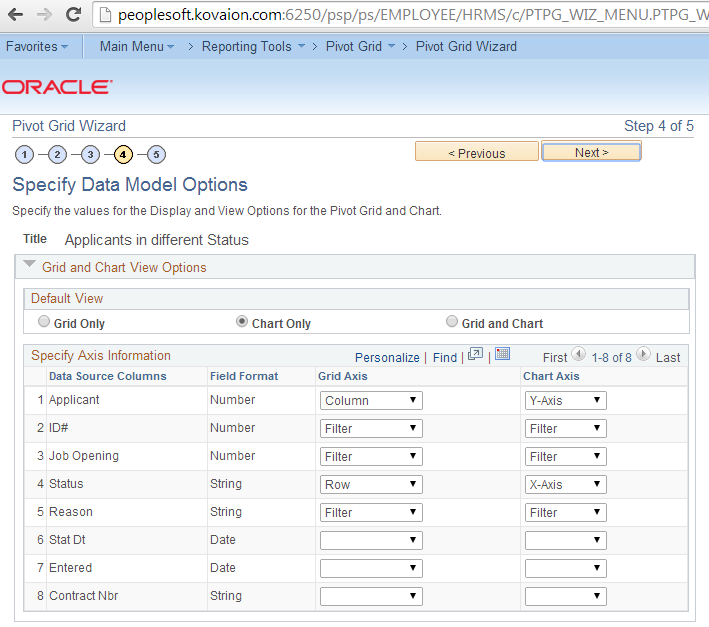
Step 4: Provide X and Y axis and filters.
Specify data model options providing X and Y Axis and specify filtering in fourth step.

Step 5: Verify the pivot grid, publish it as pagelets or related content.


Limitations on Pivot Grid:
  • Supports only PS Query as data source.
  • Pivot Grid Does not have a Vertical Scroll bar for viewing data, but it displays all possible rows based on the current layout.


Author,
Dilip Kumar
Tools Group
dilip.kumar@kovaion.com

Friday 8 August 2014

PeopleSoft Forms and Approval Builder


Forms and Approval Builder are designed to make a paperless office making the task easier for users. A form can be designed and published in 30 minutes by the functional resources with minimal PeopleSoft technical skillset. The  transactional data submitted/approved from forms is validated, processed and stored into transaction tables through PeopleSoft Component Interface.

Few Business Case include: 
  • Subject Matter Experts(SME) /Functional Analyst (FA) can create forms easily. e.g Recruiter can create a form to store additional information of applicants.
  • SME/FA can create any form with their company logo and can provide the instructions and sample attachments.
In general, Online form builder is taking PeopleSoft one step closer to a complete SAAS model, in a way that SMEs/Functional Analyst can create the forms (Very minimal hands on from technical team).
Benefits:
  • Easy online designer.
  • Minimal PeopleSoft technical knowledge is required.
  • Submitted forms can be approved and then data can be inserted into transaction tables on a single button click.
  • History data is stored automatically for each approval chain. Prompt records can be defined for entering data.
  • Form fields can be arranged in one or two columns and can be made required so that users thoroughly complete the form.
  • From Date and To Date can be provided for a form.
  • Enhanced security- forms can be locked down after submission or approval.
  • In the instructional text, rich text enables you to upload any pictures e.g. company logo, personalizing the form for the company.
  • Forms can be inactivated if not needed, so that it is not visible in the navigation.
  • Upgrades to PeopleSoft system do not require upgrading the forms.

Development Process:
  1. Define the prompt tables required for form. 
  2. Design the form, provide instructions/attachments, set the approval path and activate the form. 
  3. Map the Form fields to Component Interface.

Step 01: Define the prompt records required for form.
Navigation: Main Menu->Enterprise Components->Forms->Define Prompt Records
Provide the required prompt records for your form as shown below


Step 02: Design the form,provide instructions/attachments,set the approval path and activate form.
Navigation:Main Menu-> Enterprise Components->Forms->Design a FormThe intuitive form design wizard guides user step by step for publishing the form

Designing a form has six substeps:
02a: Provide Form basic information
02b: Provide Instructions for the Form-as how to use the form
02c: Provide Form Fields and Form Field edits
02d: Provide Attachments-optional
02e: Define the navigation and publish to menu
02f: Define the approval if needed

After these steps a Form can be reviewed and activated.


While designing the form, if administrator wants to restrict the user for selecting the values of other fields based on other fields, then prompt control is helpful.E.g. after selecting the emplid, only the related name should appear in the prompt.

This could be achieved in two steps:

i) Add a row in EmployeeID prompt control grid and specify the record name that equates to name record and specify emplid in field as shown in figure below.

ii) Define Name field as a Prompt field, and specify the same record as Prompt record that was used in the EmployeeID Prompt Control grid.

Step03: Map the Form fields to Component Interface.
Navigation: Main Menu->Enterprise Components->Forms->Form to CI MappingProvide CI, Level0 Record and Menu name. The fields will be automatically populated.


Form can be viewed in the navigation where published.


After Submission, forms go for approval (if defined).and then approver or administrator can Save and Post the form. Values will be stored in database.

Points to Remember:
  • The form field and record field should be of same data type. 
  • Provide menu name in Form to CI Mapping , if skipped, Save and Post Form button will not be visible for posting the form to database. 
  • Provide Form field name while mapping CI to Form (in Form to CI Mapping). 
Limitations:
  • Transactional data can be added, but the existing cannot be updated (very similar to Google Forms).
  • Not possible to design grid for the users to insert parent/child data. 
  • Not possible to make control the display like Enable/Disable, Visible/invisible depending on program logic. 
  • It cannot be designed for self service functionality. 

Author,
Madhur Mohini
Kovaion - PeopleSoft Consulting Practice
madhur.mohini@kovaion.com