HR Notification is available from PeopleSoft HCM 9.2. It is a simple and powerful communication tool,
- It allows HR administrators to send out rich text announcements or personalized email to group of employees or a person with the support of PeopleSoft.
- In today’s hyper connected world, having this integrated communication tool can be a game changer, as everything is shared on the go.
A small play to understand the benefits of HR Announcements,
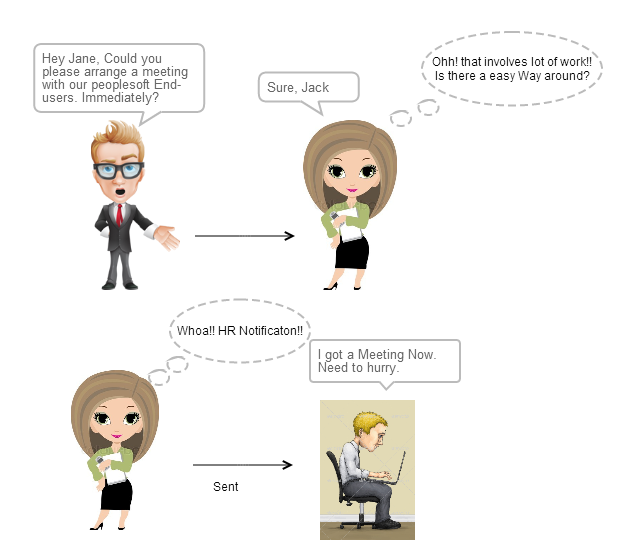
And Jane’s Announcement goes as,

HR Notification can also be used for cases like,
- Announcement to employees on updating personal details.
- Request employee to utilize leave balance prior to the closure.
- Request a recruiter to prioratize and work on a specific job opening.
- Monthly news letter release.
The process flow is user friendly
The whole activity can be achieved pretty easily. We did the whole configuration in less than 30 mins.
Configuration of HR Notification
- Installation Settings
Navigation: Main Menu > Setup HCM > Common Definitions > HR Notifications > Installation Settings

Check ON 'Enable HR Notifications' to enable the HR Notification functionality.
Enter the user role to limit the rights to publish announcements only to users with that user role. If no roles are selected, all users are able publish announcements.
- Notification Recipient Setup.
Navigation: Main Menu > Set Up HCM > Common Definitions > HR Notification > Installation Settings.
Specify the Recipient which you want to add. E.g., Company, Employee, Department.
- Configure and Assign Embedded Links.
Navigation: Main Menu > Set Up HCM > Common Definitions > HR Notification > Configure Embedded Link/Assign Embedded Link.
Use the Configure Embedded Link page to set up links that can be included in notifications.
Use the Assign Embedded Links page to associate embedded links to application components.
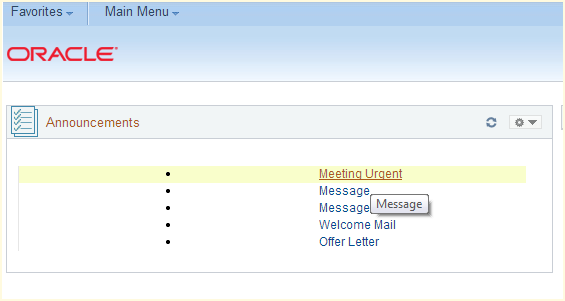
- Publish the Announcements.
Navigation: Main Menu > Set Up HCM > Common Def > HR Notification > HR Notification or to the application component where this feature is enabled.
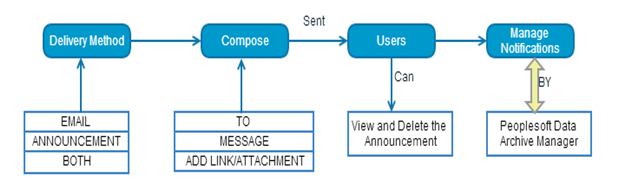
Select the Delivery method as Announcement, Mail or Both.
Click Add link to attach any configured link and click Add attachments if you want to attach any file.
Click Advanced Options to change the posting Options and Recurring options.
Posting Options – Give Posting date and Expiration date if needed. User can delete this Announcement from their list if you check “User may delete this announcement” checkbox.
Recurring Options – Check Recurring Checkbox if you want to schedule the Announcement.
Click Send.
Note: Run the ‘Process Notification’ Process in order to send the Recurring pending announcements.
Navigation: Main Menu > Set Up HCM > Common Def > HR Notification > Process Notification.
How to Achieve this for any PeopleSoft Component? – How!!!
PeopleTools provides notification capabilities on every PIA page through the Notify button that appears at the bottom of the page. Clicking the button sends email notifications to the interested parties. But, this can be replaced with HR Notifications and take advantage of the additional features it offers, such as sending announcements that show on Workcenter or Dashboard pages, or sending delayed notifications.
- Disable Notify option in Component Level.
Make sure Notify option is disabled under internet tab.
- Add a Sub Page.
Add the “HCSC_ADHOC_NFY_SBP” subpage to the component page where the HR Notifications feature needs to be enabled.
The subpage must be at level 0. With that, the standard People Tools Notify button is overridden and the notification functionality is now being redirected and handled by the HR Notifications feature.
Make sure that by this time, the Enable HR Notification check box is enabled on Installation Setting Page.
- Some PeopleCode Tricks – Finally!!!
Declare this peoplecode in HCSC_ADHOC_NFN.HCSC_ADHOC_NFY (Component level Rec Field Change).
import HCSC_NOTIFICATION:RecipientList;
Component HCSC_NOTIFICATION:RecipientList &Recipients;
&Recipients.AdhocNotify();
Archive HR Notification Data – PeopleSoft Data Archive Manager:
Notification data can grow out of proportion over time. To keep the amount of data manageable, the system delivers an archive object, two archive queries and an archive template that are used to archive notification data through PeopleSoft Data Archive Manager.
The HR Notification Announcements can be archived based on
- Posting date - All announcements posted before a certain date will be archived.
- Expiration date - All announcements which are expired before a certain date will be archived.
How to Achieve?
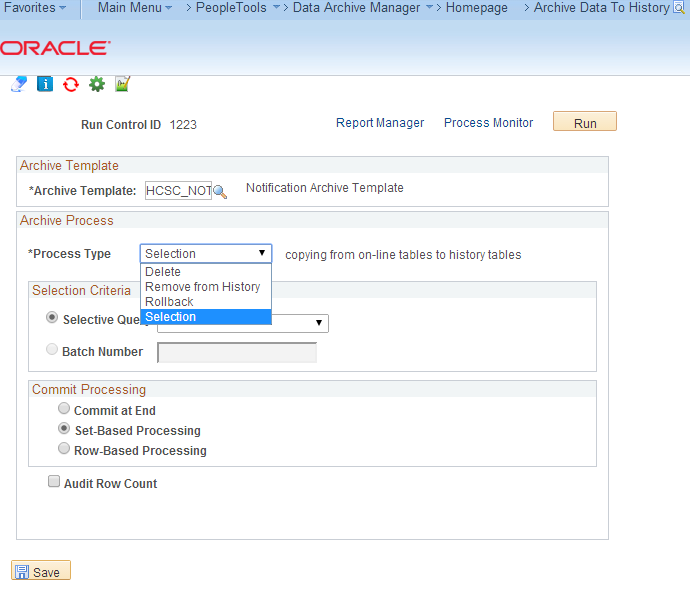
Navigation: Main Menu > People tools > Data Archive Manager > Archive Data to history
Navigation: Main Menu > People tools > Data Archive Manager > Archive Data to history
Select HCSC_NOT as Archive Template and select the Process type.
Click RUN to select the process and run it.
Once the process goes to success, data is archived.
Pain Relievers:
- Frame an announcement to a group.
- Maintain the Security for each publish, based on the character.
- Archive the old announcements for future.
- Can attach the relative link to the component in the announcement.
- Report the error on the go by attaching the screenshots, if needed.
- Download the output of a report and attach it for further analytics.
- Edit the announcement even if it is sent.
- Publish the announcement on recurring basis.
Limitations:
- HR notifications can’t be Embed and auto-populate the link for a particular transaction.
- Customization needed, if we want to achieve it for any PeopleSoft component.
- Can’t publish the announcement if Process Scheduler is down.


